

Until recently, I was an Oreo purist. I thought that a crisp Oreo cookie was best experienced in one way (and one way only): dipped in ice-cold milk.
Not in a cheesecake. Not in ice cream. Just Oreo and milk.
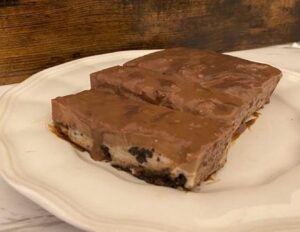
Then I tried this decadent, creamy-meets-crunchy Oreo, Milo, and chocolate layered pudding cake, and my mind. Was. BLOWN. I was so wrong!
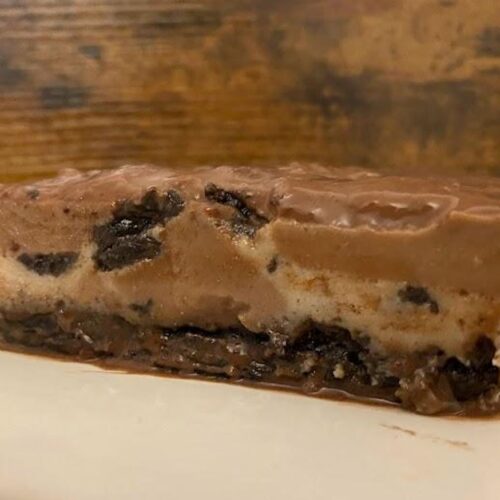
Picture this: a buttery crushed Oreo crust. Then a glorious mix of crumbled Oreos and lightly sweetened milk layered on top of that. Then the malt chocolate flavor of Milo layered on top of that. And to top it off, a layer of rich dark chocolate melted in chocolate milk.
It takes the classic Oreos and milk, adds Milo and chocolate, and creates a sumptuous layered masterpiece— all without using the oven. And while it contains pudding components, the whole thing comes together like a solid sliceable cake that looks as awesome as it tastes!
So if you’re an Oreo purist– or just an Oreo lover–read on to learn how to make this next-level layered pudding cake. Oreo purists, I promise you’ll change your mind.
What is a No-Bake Pudding Cake?
It’s pudding! It’s cake! It’s a pudding cake!
We call this a “pudding cake” because it’s a dessert that contains layers of creamy pudding but is firm enough to stand alone. The whole thing sits on a crushed Oreo crust, and you can slice it and serve it just like a cake, but it doesn’t require baking! Just cook each layer on the stove and refrigerate, and your no-bake pudding cake will firm up just fine.
The pudding layers in this cake are flavored with Oreo, Milo, and dark chocolate, with milk/chocolate milk as a base and gelatin to hold it all together.
What is Milo and Where Can I Find It?
Milo is a delicious chocolate malt beverage made by Nestle. It was first created in Australia, and is now widely available in Australia, Asia, Africa, and Latin America.
Most grocery stores in the US don’t carry Milo, but you can still buy this specialty item in a few places, including Amazon and the international section of some Asian grocery stores.
What Can I Use if I Can’t Find Milo?
If you can’t find Milo, don’t worry, you can still make this awesome recipe! I successfully swapped 3 tablespoons of Nesquik for the Milo in a trial run of this no-bake pudding cake. Now, I’m NOT saying they are the same (look up “Milo vs Nesquik” and you’ll see that people have strong feelings on this!), but either works well in this layered pudding cake recipe.
What’s in an Oreo, Milo, and Chocolate Pudding Cake?

You’ll need the following ingredients to make each layer of this scrumptious, no-bake pudding cake:
Oreo Base
- 11 Oreo cookies
- 4 Tbsp of melted butter.
- I used salted butter, but you can use unsalted butter or margarine too
Milo Layer + Oreo with Milk Layer
- 1 ½ 7g packet of unflavored gelatin
- 1/2 cup of granulated sugar
- ⅛ tsp salt
- 1 Tbsp cornstarch
- 3 cups whole milk
- 3 Tbsp of Milo (see above for tips on finding it in the US and available substitutions),
- 2 Oreos broken into larger pieces
Chocolate Layer
- Half of a 7g packet of unflavored gelatin
- 1 Tbsp granulated sugar (or more to taste)
- 1 ½ cups of chocolate milk
- ½ cup of dark cooking chocolate
How to Make an Oreo, Milo, and Chocolate Pudding Cake
Follow these steps to make your decadent layered pudding cake:
No-Bake Oreo, Milo, and Chocolate Layered Pudding Cake
Equipment
- 1 9” x 5” loaf pan for a rectangle shape
Ingredients
- 13 Oreos Oreo Cookies
- 4 tbsp Butter (melted)
- 2 Packets Unflavored Gelatin
- 1/2 cup + 1 tbsp Granulated Sugar
- 1/8 tsp Salt
- 1 tbsp Cornstarch
- 3 1/4 Cups Whole Milk
- 3 tbsp Milo Powder
- 1 1/2 Cups Chocolate Milk
- 1/3 Cup Dark Cooking Chocolate
Instructions
- Line a baking pan with parchment paper. Leave some extra paper beyond the top of the pan to make it easy to remove the finished cake. Since this no-bake pudding cake gets its shape from the container you put it in, you can make it in a variety of shapes; I used a 9” x 5” loaf pan for a rectangle shape, but you could easily use a Bundt pan or circle pan instead for a different shape.
- Make the base:
- Crush the 11 Oreos. You can use a food processor or put them in a Ziploc bag and smash them with a rolling pin or a serving spoon.
- Mix the crushed Oreos with the 4 tablespoons of melted butter.

- Reserve ¼ cup of the crushed Oreo and butter mixture to use in the next layer.
- Press the remaining Oreo and butter mixture into the bottom of the baking pan in an even layer using a spoon or the bottom of a glass.
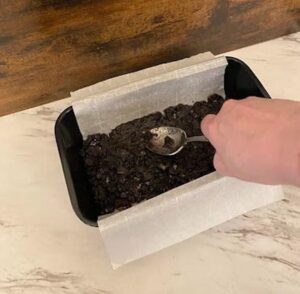
- Put the pan in the freezer for 15 minutes.
- Make the Milo Layer and the Oreo + Milk Layer:
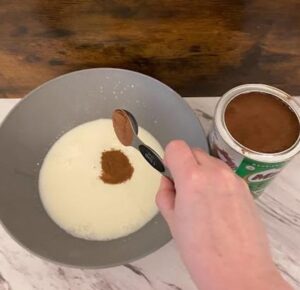
- Combine 1 ½ packets of gelatin powder, ½ cup sugar, salt, and cornstarch in a pot. Stir well. Pour in the whole milk and stir well again.
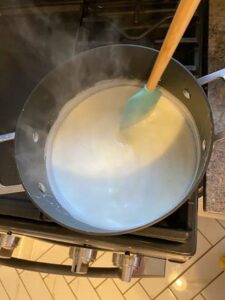
- Cook over medium heat until boiling, stirring often. Boil for 1 minute.
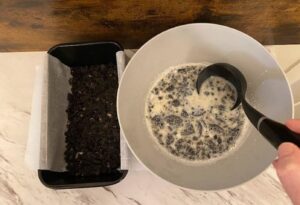
- Split it in half across two bowls.
- In the first bowl, add the ¼ cup Oreo mixture from earlier. Cover the other bowl to keep it warm for later.
- Crumble the remaining 2 Oreos into large chunks and add to the first bowl.
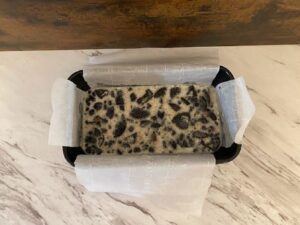
- Spoon the contents of the first bowl carefully on top of the Oreo base.
- Refrigerate for 1 hour or until mostly set. The surface should be solid and slightly sticky to the touch.
- In the second bowl, add the Milo, stir well, and spoon it carefully on top of the Oreo layer. It should sit on top of the Oreo layer- if it doesn’t, wait longer for the Oreo layer to set.
- Refrigerate for 1 hour or until mostly set. Again, the surface should be solid and slightly sticky to the touch.

- Make the Chocolate layer:
- Mix all ingredients in a pot.
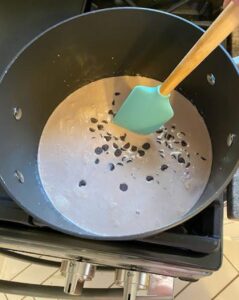
- Cook over medium heat until boiling, stirring often.
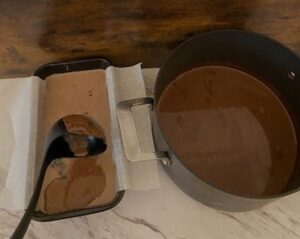
- Spoon the chocolate layer carefully over the Milo layer. It should sit on top of the Milo layer if it doesn’t, continue chilling until the Milo layer is set.
- Refrigerate until fully set, about 2 hours.
- Carefully lift it out of the pan using the parchment paper edges.
- Slice and serve. Store in the refrigerator for up to 3 days.
Notes
- Don’t wait until each layer has become too solid or hard before pouring the next layer, because it will prevent the adherence between the layers. You can test the solidity of the layer by pressing softly using your fingertip on the layer surface. If the surface is dry but still flabby, it is ready to be topped.
- Spoon each layer on gently. If you’re not careful, it will break the seal of the layer below it.
Final Words
This has to be one of the best Oreo dishes I have ever prepared and I hope you feel the same way! If you or your family is an Oreo lover like me this recipe is guaranteed to satisfy. Thanks for reading and as always keep your kitchen Hot and Salty!